Team Three/Final Paper
(→Team 3 Final Paper: The Tools and Albi Story) |
(→Vision Code) |
||
| (20 intermediate revisions by one user not shown) | |||
| Line 1: | Line 1: | ||
== Team 3 Final Paper: The Tools and Albi Story == | == Team 3 Final Paper: The Tools and Albi Story == | ||
| − | + | [[File:AlbiAndTeam.jpg]] | |
| + | == Overall Strategy == | ||
| + | Our focus was on taking advantage of the rule that allowed the launching of balls to develop a strategy to collect and launch one ball at a time. Thus, our strategy would be relatively simple: find a ball, find yellow, launch ball. Unfortunately, we ran into several problems in the implementation that we weren’t able to solve by the competition. We were never able to reliably detect when we had “loaded” a ball into the catapult- our strategy hinged on using an LED-photosensor combination, but we couldn’t get our hands on a photosensor. Secondly, we ended up going with one camera due to sensor points. However, we collected balls and fired in opposite directions- meaning we had to precisely calibrate our robot to turn 180 degrees before firing off a ball. Thirdly- the best camera placement to collect balls is low, so that blue line filtering isn’t as needed. But the best place for a yellow-wall finding camera is high, so that the direction of the yellow ball is detected no matter where the robot is. We were forced to go with a compromise between the two, which didn’t do as good a job at either task. Finally, and most cripplingly, the range of our catapult was never quite enough to be a serious delivery method. We achieved a 4-5 feet range (wall clearance) in theoretical testing, but when we used a motor controller instead of a simple switch, the range dropped to ~3 feet, which isn’t really enough to gain efficiency. Using relays would have solved the problem, but by then it was too late to switch over. | ||
| + | Ultimately, our strategy held promise, but we failed to overcome several technical challenges. | ||
| − | + | __TOC__ | |
| + | == Team Members == | ||
| + | Vamsi Aribindi: Course 16 Junior - head coder/consultant | ||
| + | Katherine Hobbs: Course 16 Sophomore - head vision coder/entertainment | ||
| + | Rebecca Navarro: Course 16 Sophomore - head builder/scribe | ||
| − | + | Anthony Venegas: Course 16 Sophomore - head designer/CAD Expert | |
| + | == Mechanical Design == | ||
| + | ===Design Process=== | ||
| + | Albi underwent a few iterations. The initial version of Albi was constructed out of acrylic and replaced our peg-bot for the first mock competition. The initial design was large and simple, essentially a box with wheels. The issues with it were due to it's weight. The robot in this state was clunky and slow, and the weight was too much for the motors to move it properly. | ||
| + | [[File:Albi1_0.jpg]] | ||
| − | ''' | + | '''Albi 1.0''' |
| + | [[File:Albi1_0CAD.jpg]] | ||
| + | '''Initial CAD drawing''' | ||
| + | This first design also depended on the use of a solenoid as the firing mechanism. We ordered a solenoid and tested it, but found it's force output highly lacking, and our dreams of a solenoid powered ball cannon floated away. Seeing the lack of success of this initial design in the first mock competition, we headed back to the computer to draw up a new design. A couple redesigns brought Albi's concept to its final version. | ||
| − | '''Conclusions/suggestions for other teams''' | + | ===Final Design=== |
| + | |||
| + | [[File:Albi2_0.jpg]] | ||
| + | |||
| + | '''Albi 2.0!''' | ||
| + | |||
| + | There are a few key aspects behind this final design. First, we wanted to place the wheels in a centered location, allowing the robot to turn in place for more agile movement through the track. We also decided to use a circular base, which was made of sheet aluminum. Having a round-based robot would prevent the robot from getting stuck on walls or corners while turning in place. Albi's final iteration opted for a compact, lightweight frame. Since one of the tie-breaking criteria was weight (and we are all aerospace engineers who love making things lightweight), the design attempted to utilize the most efficient use of space and as little acrylic as possible. This included using thinner acrylic and making the robot's base have a diameter of 11 inches. | ||
| + | |||
| + | [[File:Albi2_0CAD.jpg]] | ||
| + | |||
| + | '''CAD model of the final design''' | ||
| + | |||
| + | One design we maintained through all the iterations of Albi was the collection mechanism, a typical rubber-band roller powered by a small motor. The roller would pull the ball up a ramp and knock it into the launching mechanism. | ||
| + | |||
| + | [[File:Rubberband.jpg]] | ||
| + | |||
| + | '''Rubber band collector - rubber bands strung over gears''' | ||
| + | |||
| + | The final and most major design characteristic was our launching mechanism. Really wanting to make balls fly through the air, we used a catapult mechanism to launch balls. It involved a motor attached to a lever arm with a cup at the end. By torquing the motor and stopping it at about vertical, we were able to send balls flying quite a long distance. | ||
| + | |||
| + | [[File:CatapultCAD.jpg]] | ||
| + | |||
| + | '''Launching Mechanism''' | ||
| + | |||
| + | The robot was constructed mainly using a CNC laser cutter to manufacture the acrylic, and a CNC water-jet to cut the aluminum. It was held together by angle brackets and bolts, even glue in some cases, and plenty of tape. In order to stop the catapult bar and keep Albi from destroying himself, we placed an aluminum rod between shaped pieces of acrylic that stopped the catapult at 90 degrees without putting too much strain on the motor. | ||
| + | |||
| + | ===Sensors=== | ||
| + | Bump sensors were are main detection system, placed all around the robot. They acted as a simple on/off switch to tell the Arduino when Albi hit something (to wire them, we simply connected one lead to ground and the other to a digital input slot). We connected many of them with aluminum bars, so the whole bar acted as a bump sensor, giving us better bump detection without needing more sensors or wiring. We also used a couple of infrared sensors in the design to attempt to follow the walls in search of target balls. Unfortunately, their low position made them difficult to use, as the bump sensors themselves got in the way and the IR sensors ended up detecting EVERYTHING. The code also did not handle them well, so we really had no need of them. | ||
| + | |||
| + | Ideally, we wanted to use some form of break sensor to detect when we had captured a ball, but could find nothing suitable. Therefore, Albi always assumed he had a ball if he tried to go for it. | ||
| + | |||
| + | ===Other uses for sensor points=== | ||
| + | The final design required 4 motors total, two drive motors to power movement, one small motor powering our collector, and the catapult motor, therefore we used two motor controllers in our design to control all four. One unforseen consequence was that the motor controller limited the current output to the motors, drastically shortening the range of the catapult. This could have been fixed with a bridge, but time was not on our side. | ||
| + | |||
| + | Gears were also used to run the rubber band collector. | ||
| + | |||
| + | == Software Design == | ||
| + | |||
| + | ===Vision Code=== | ||
| + | |||
| + | Our vision code continuously took images from the camera and allocated image data. We then smoothed the images which, in other words, means we applied a Gaussian blur to the image. We then converted the images from RGB to HSV and applied filters to detect the yellow walls and red balls. | ||
| + | In our red ball finding code we had to take value and saturation into consideration to account for the fact that the balls are round and the robot will not see a circle of red, but a blob with a red hue and many different values and saturations. We also had to consider value and saturation in our yellow wall finding code but the range of values and saturations shrunk considerably since the walls are two-dimensional. We discovered the range of hues, values, and saturations for the red balls and yellow walls by trial and error, which actually worked really well. The robot was almost always able to correctly identify red and yellow objects while ignoring other colors. | ||
| + | |||
| + | In order to ensure that the robot detected a red ball and not another miscellaneous red object, we set a roundness threshold. We also set an area threshold so the robot would not try to pick up red smudges on the walls. Once the red ball finding method was applied to the image, a list of coordinates of the centers of the red balls in the image was returned to the robot. The robot then chooses the red ball with the greatest y-value (the closest red ball) and uses the x-value to determine which way to turn so that the ball will be directly in front of it. | ||
| + | Our yellow wall finding code included and area threshold so that the robot would only think it had found a yellow wall when it was closes enough to the wall to shoot over it. In retrospect we should have made this two separate states—find yellow wall which would find any yellow on the field and go to yellow which would tell the robot to get close enough to shoot the ball over the wall. | ||
| + | |||
| + | Due to a shortage on time we elected not to write code that would identify the blue top of the wall and ignore everything above it. Instead, we angled our camera so that it would never see above the top of the wall. This way we did not have to worry about the robot trying to get a ball on the other side of the wall. | ||
| + | |||
| + | [[File:GaussianImage.jpg]] | ||
| + | |||
| + | '''Here’s an image with a Gaussian blue applied to it''' | ||
| + | |||
| + | [[File:RedBallFinding.png]] | ||
| + | |||
| + | '''Here’s the same image after the red ball finding code has been applied''' | ||
| + | |||
| + | ===States=== | ||
| + | The software matched the simplicity of our hardware design, and used a state machine. There were five states: FindBall, SeekBall, GetBall, FindYellow, SeekYellow, and Shoot. | ||
| + | |||
| + | The FindBall technique rotated the robot a circle, in six steps, looking for a ball at each angle. If a ball was found, the machine transitioned to the GetBall state. Otherwise, the machine transitioned to SeekBall. | ||
| + | |||
| + | GetBall used a PID controller to drive the robot towards the closest ball detected. It then transitioned to the FindYellow State. Unfortunately, we did not manage to acquire a photosensor, which (with an LED) would have told us whether or not we had captured a ball. Thus, our only option was to assume we had captured a ball, and transition to FindYellow. | ||
| + | |||
| + | Seekball randomly wandered around the field. We attempted to implement wall-following, but were not able to get it working. In its place, we just used six bump sensors with aluminum bars between them, covering the entire front 180 degrees of the robot, which was fairly effective in preventing jams. | ||
| + | |||
| + | FindYellow copied FindBall, except it looked for a wall instead. It transitioned to Shoot if it found yellow, or to SeekYellow if it did not. | ||
| + | |||
| + | SeekYellow wandered the field randomly, for a set period of 20 seconds, looking for yellow. If it didn’t find one, it transitioned to shoot in a random direction. This was, of course, suboptimal, but we didn’t want to get stuck with a ball. | ||
| + | |||
| + | Shoot found the yellow wall, turned 180 degrees from it so that the catapult would fire in its direction, and then activated the catapult. | ||
| + | |||
| + | == Overall Performance == | ||
| + | |||
| + | [[File:RandomAlbi.png]] | ||
| + | |||
| + | ===Mock 1=== | ||
| + | |||
| + | [[File:AlbiMock1.png]] | ||
| + | |||
| + | For the first mock contest, we didn't really have super high expectations. Since the collector wasn't attached and the solenoid wasn't in, we really just wanted to test out the code we had so far. At this point we had just switched to Python. This was evident in the way that Albi attempted to collect balls - he spun in a bajillion circles. Luckily for us, the circles slowly expanded and we were able to run over and 'collect' one ball, displacing 2 others. This got us 4th place and we were actually optimistic since the coders were 'pretty sure' they knew how to fix it. The positive outcome is that this competition caused us to seriously reconsider our design and look at methods that other teams used that worked. | ||
| + | |||
| + | ===Mock 2=== | ||
| + | |||
| + | [[File:AlbiMock2.png]] | ||
| + | |||
| + | At this point we had a working robot. Kind of. No collector still (gear issues). After a bold attempt to solder everything in less than an hour, we excitedly ran to the contest, put him down, and...nothing. He decided not to move and to give the coders never-before-seen errors. Everything worked mechanically though... | ||
| + | |||
| + | ===Mock 3=== | ||
| + | |||
| + | [[File:AlbiMock3.png]] | ||
| + | |||
| + | Still ended up sad because the battery was dead and we couldn't even test anything. Let this be a lesson to the future - always charge your battery! | ||
| + | |||
| + | ===Seeding=== | ||
| + | This is when we really were able to test our code in the full arena. Albi was able to detect balls and differentiate them from one another (see vision code section) but the calibration for the yellow wall was off. Due to a sleep-deprived coding error, Albi moved only in circles. This was caused by imputing a 'move forward' command to one motor twice instead of once to each motor. | ||
| + | |||
| + | ===Final Competition=== | ||
| + | Albi was eliminated almost immediately, but not for lack of trying. We suspect that there was an error in the code that caused him to move backwards instead of forwards when collecting a ball. His catapult did very well and impressed the crowd with its trollface. Then, due to stage fright (and a possibly misaligned camera) he reverted back to his favorite pastime: circles. | ||
| + | |||
| + | ===Overall Impression=== | ||
| + | Overall, our design was sound. While we discussed the potential for collecting several balls at once in order to fling over multiple projectiles, the redesign that it would involve triggered our more lazy side. If we had more time, we would have expanded our catapult to throw more balls farther (with the installation of a bridge). Our biggest issue in the end was the code. Mechanically, everything on the robot functioned correctly - the collector collected, the catapult would have thrown objects (if it could actually go towards a ball), the wheels gripped, the bump sensors detected walls and allowed us to avoid being stuck and nothing exploded. However, starting with Java lost us almost two weeks worth of coding/debugging. Our coders were under a lot of pressure (there were several sleepless nights) and in the end they just didn't account for everything. The overall lack of coding experience also hurt us: only Vamsi really knew how to code and Katherine was forced to blindly try what she had never done before (with surprising amounts of success) while Rebecca and Anthony avoided all coding at all costs for fear of dividing by zero and opening a rift in the universe. | ||
| + | |||
| + | ===What we learned=== | ||
| + | We learned how to better ask for help. Initially, we were terrified of appearing incompetent in front of the TAs until we realized that they will not, in fact, bite our heads off. They are there to help any level of understanding as much as they can. They are also very nice. And like cake. | ||
| + | |||
| + | We learned how to quickly build a robot from scratch. Our CAD expert became even more of an expert and we learned how to better fit things together so that they work the first time. Our natural ability to tell if a design/idea will work before even testing it improved. | ||
| + | |||
| + | Everyone learned how to solder and almost everyone learned how to solder things properly to a breadboard and circuit board. We learned how to avoid shorts and save fuses!! | ||
| + | |||
| + | We learned how to divvy up workloads and how to communicate ideas so that everyone is on the same page. | ||
| + | |||
| + | We learned to have fun, no matter how badly things are going!! | ||
| + | |||
| + | == Conclusions/suggestions for other teams == | ||
| + | |||
| + | A rather unfortunate mistake was that we attempted to rewrite the software interface in java. We are all aero-astro majors, and java is the language most of us are most comfortable with. Unfortunately, we were forced to abandon the idea and use python, as java did not play nice with opencv (the video library) on ubuntu. We lost two weeks to that fiasco. | ||
| + | |||
| + | The journal really does help. Writing everything down everyday puts into perspective how much you can accomplish in a short amount of time. Also, don't be afraid to have fun with it. We ended up doing daily quotes to keep ourselves entertained, even though we didn't keep them all on there (now that potential employers know how to use Google, we can't be too careful). | ||
| + | |||
| + | Also, be sure to get some sleep outside of the lab!! :P | ||
| + | |||
| + | [[File:SleepingVamsi.jpg]] | ||
Latest revision as of 04:22, 7 February 2012
Team 3 Final Paper: The Tools and Albi Story
Overall Strategy
Our focus was on taking advantage of the rule that allowed the launching of balls to develop a strategy to collect and launch one ball at a time. Thus, our strategy would be relatively simple: find a ball, find yellow, launch ball. Unfortunately, we ran into several problems in the implementation that we weren’t able to solve by the competition. We were never able to reliably detect when we had “loaded” a ball into the catapult- our strategy hinged on using an LED-photosensor combination, but we couldn’t get our hands on a photosensor. Secondly, we ended up going with one camera due to sensor points. However, we collected balls and fired in opposite directions- meaning we had to precisely calibrate our robot to turn 180 degrees before firing off a ball. Thirdly- the best camera placement to collect balls is low, so that blue line filtering isn’t as needed. But the best place for a yellow-wall finding camera is high, so that the direction of the yellow ball is detected no matter where the robot is. We were forced to go with a compromise between the two, which didn’t do as good a job at either task. Finally, and most cripplingly, the range of our catapult was never quite enough to be a serious delivery method. We achieved a 4-5 feet range (wall clearance) in theoretical testing, but when we used a motor controller instead of a simple switch, the range dropped to ~3 feet, which isn’t really enough to gain efficiency. Using relays would have solved the problem, but by then it was too late to switch over. Ultimately, our strategy held promise, but we failed to overcome several technical challenges.
Contents |
Team Members
Vamsi Aribindi: Course 16 Junior - head coder/consultant
Katherine Hobbs: Course 16 Sophomore - head vision coder/entertainment
Rebecca Navarro: Course 16 Sophomore - head builder/scribe
Anthony Venegas: Course 16 Sophomore - head designer/CAD Expert
Mechanical Design
Design Process
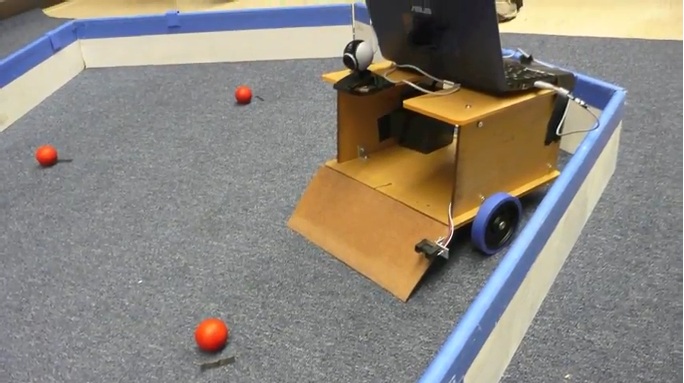
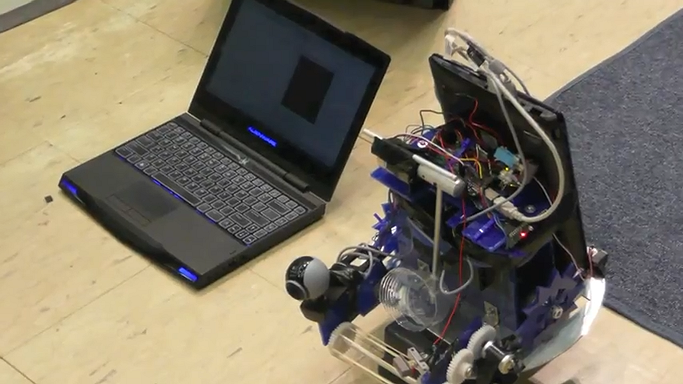
Albi underwent a few iterations. The initial version of Albi was constructed out of acrylic and replaced our peg-bot for the first mock competition. The initial design was large and simple, essentially a box with wheels. The issues with it were due to it's weight. The robot in this state was clunky and slow, and the weight was too much for the motors to move it properly.
Albi 1.0
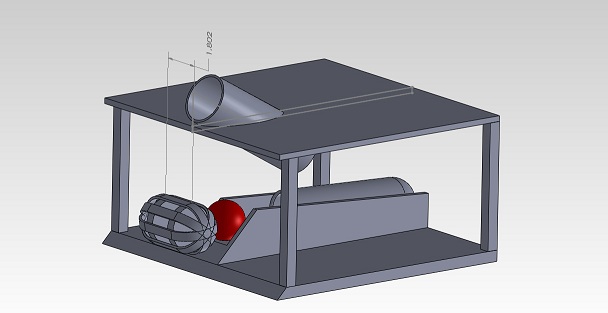
Initial CAD drawing
This first design also depended on the use of a solenoid as the firing mechanism. We ordered a solenoid and tested it, but found it's force output highly lacking, and our dreams of a solenoid powered ball cannon floated away. Seeing the lack of success of this initial design in the first mock competition, we headed back to the computer to draw up a new design. A couple redesigns brought Albi's concept to its final version.
Final Design
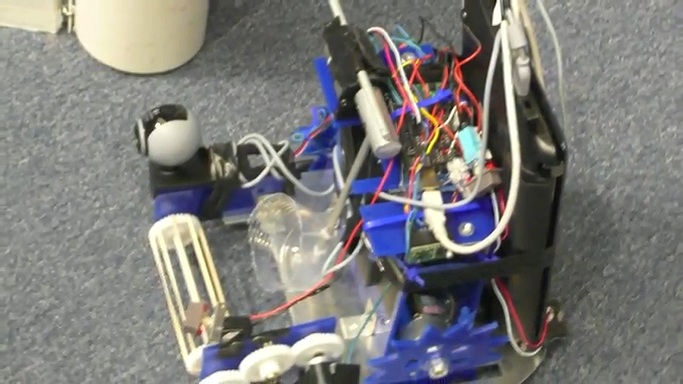
Albi 2.0!
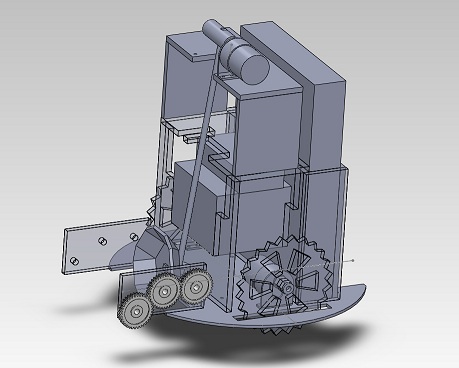
There are a few key aspects behind this final design. First, we wanted to place the wheels in a centered location, allowing the robot to turn in place for more agile movement through the track. We also decided to use a circular base, which was made of sheet aluminum. Having a round-based robot would prevent the robot from getting stuck on walls or corners while turning in place. Albi's final iteration opted for a compact, lightweight frame. Since one of the tie-breaking criteria was weight (and we are all aerospace engineers who love making things lightweight), the design attempted to utilize the most efficient use of space and as little acrylic as possible. This included using thinner acrylic and making the robot's base have a diameter of 11 inches.
CAD model of the final design
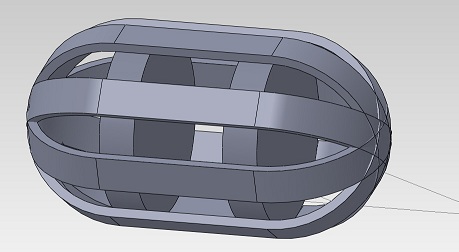
One design we maintained through all the iterations of Albi was the collection mechanism, a typical rubber-band roller powered by a small motor. The roller would pull the ball up a ramp and knock it into the launching mechanism.
Rubber band collector - rubber bands strung over gears
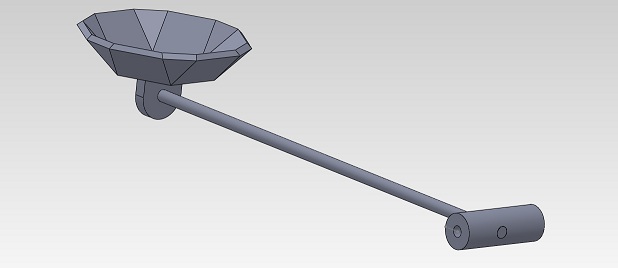
The final and most major design characteristic was our launching mechanism. Really wanting to make balls fly through the air, we used a catapult mechanism to launch balls. It involved a motor attached to a lever arm with a cup at the end. By torquing the motor and stopping it at about vertical, we were able to send balls flying quite a long distance.
Launching Mechanism
The robot was constructed mainly using a CNC laser cutter to manufacture the acrylic, and a CNC water-jet to cut the aluminum. It was held together by angle brackets and bolts, even glue in some cases, and plenty of tape. In order to stop the catapult bar and keep Albi from destroying himself, we placed an aluminum rod between shaped pieces of acrylic that stopped the catapult at 90 degrees without putting too much strain on the motor.
Sensors
Bump sensors were are main detection system, placed all around the robot. They acted as a simple on/off switch to tell the Arduino when Albi hit something (to wire them, we simply connected one lead to ground and the other to a digital input slot). We connected many of them with aluminum bars, so the whole bar acted as a bump sensor, giving us better bump detection without needing more sensors or wiring. We also used a couple of infrared sensors in the design to attempt to follow the walls in search of target balls. Unfortunately, their low position made them difficult to use, as the bump sensors themselves got in the way and the IR sensors ended up detecting EVERYTHING. The code also did not handle them well, so we really had no need of them.
Ideally, we wanted to use some form of break sensor to detect when we had captured a ball, but could find nothing suitable. Therefore, Albi always assumed he had a ball if he tried to go for it.
Other uses for sensor points
The final design required 4 motors total, two drive motors to power movement, one small motor powering our collector, and the catapult motor, therefore we used two motor controllers in our design to control all four. One unforseen consequence was that the motor controller limited the current output to the motors, drastically shortening the range of the catapult. This could have been fixed with a bridge, but time was not on our side.
Gears were also used to run the rubber band collector.
Software Design
Vision Code
Our vision code continuously took images from the camera and allocated image data. We then smoothed the images which, in other words, means we applied a Gaussian blur to the image. We then converted the images from RGB to HSV and applied filters to detect the yellow walls and red balls. In our red ball finding code we had to take value and saturation into consideration to account for the fact that the balls are round and the robot will not see a circle of red, but a blob with a red hue and many different values and saturations. We also had to consider value and saturation in our yellow wall finding code but the range of values and saturations shrunk considerably since the walls are two-dimensional. We discovered the range of hues, values, and saturations for the red balls and yellow walls by trial and error, which actually worked really well. The robot was almost always able to correctly identify red and yellow objects while ignoring other colors.
In order to ensure that the robot detected a red ball and not another miscellaneous red object, we set a roundness threshold. We also set an area threshold so the robot would not try to pick up red smudges on the walls. Once the red ball finding method was applied to the image, a list of coordinates of the centers of the red balls in the image was returned to the robot. The robot then chooses the red ball with the greatest y-value (the closest red ball) and uses the x-value to determine which way to turn so that the ball will be directly in front of it. Our yellow wall finding code included and area threshold so that the robot would only think it had found a yellow wall when it was closes enough to the wall to shoot over it. In retrospect we should have made this two separate states—find yellow wall which would find any yellow on the field and go to yellow which would tell the robot to get close enough to shoot the ball over the wall.
Due to a shortage on time we elected not to write code that would identify the blue top of the wall and ignore everything above it. Instead, we angled our camera so that it would never see above the top of the wall. This way we did not have to worry about the robot trying to get a ball on the other side of the wall.
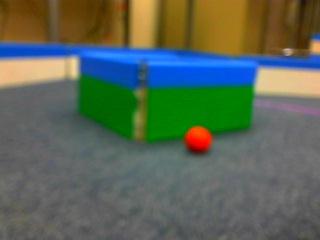
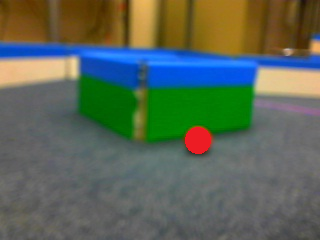
Here’s an image with a Gaussian blue applied to it
Here’s the same image after the red ball finding code has been applied
States
The software matched the simplicity of our hardware design, and used a state machine. There were five states: FindBall, SeekBall, GetBall, FindYellow, SeekYellow, and Shoot.
The FindBall technique rotated the robot a circle, in six steps, looking for a ball at each angle. If a ball was found, the machine transitioned to the GetBall state. Otherwise, the machine transitioned to SeekBall.
GetBall used a PID controller to drive the robot towards the closest ball detected. It then transitioned to the FindYellow State. Unfortunately, we did not manage to acquire a photosensor, which (with an LED) would have told us whether or not we had captured a ball. Thus, our only option was to assume we had captured a ball, and transition to FindYellow.
Seekball randomly wandered around the field. We attempted to implement wall-following, but were not able to get it working. In its place, we just used six bump sensors with aluminum bars between them, covering the entire front 180 degrees of the robot, which was fairly effective in preventing jams.
FindYellow copied FindBall, except it looked for a wall instead. It transitioned to Shoot if it found yellow, or to SeekYellow if it did not.
SeekYellow wandered the field randomly, for a set period of 20 seconds, looking for yellow. If it didn’t find one, it transitioned to shoot in a random direction. This was, of course, suboptimal, but we didn’t want to get stuck with a ball.
Shoot found the yellow wall, turned 180 degrees from it so that the catapult would fire in its direction, and then activated the catapult.
Overall Performance
Mock 1
For the first mock contest, we didn't really have super high expectations. Since the collector wasn't attached and the solenoid wasn't in, we really just wanted to test out the code we had so far. At this point we had just switched to Python. This was evident in the way that Albi attempted to collect balls - he spun in a bajillion circles. Luckily for us, the circles slowly expanded and we were able to run over and 'collect' one ball, displacing 2 others. This got us 4th place and we were actually optimistic since the coders were 'pretty sure' they knew how to fix it. The positive outcome is that this competition caused us to seriously reconsider our design and look at methods that other teams used that worked.
Mock 2
At this point we had a working robot. Kind of. No collector still (gear issues). After a bold attempt to solder everything in less than an hour, we excitedly ran to the contest, put him down, and...nothing. He decided not to move and to give the coders never-before-seen errors. Everything worked mechanically though...
Mock 3
Still ended up sad because the battery was dead and we couldn't even test anything. Let this be a lesson to the future - always charge your battery!
Seeding
This is when we really were able to test our code in the full arena. Albi was able to detect balls and differentiate them from one another (see vision code section) but the calibration for the yellow wall was off. Due to a sleep-deprived coding error, Albi moved only in circles. This was caused by imputing a 'move forward' command to one motor twice instead of once to each motor.
Final Competition
Albi was eliminated almost immediately, but not for lack of trying. We suspect that there was an error in the code that caused him to move backwards instead of forwards when collecting a ball. His catapult did very well and impressed the crowd with its trollface. Then, due to stage fright (and a possibly misaligned camera) he reverted back to his favorite pastime: circles.
Overall Impression
Overall, our design was sound. While we discussed the potential for collecting several balls at once in order to fling over multiple projectiles, the redesign that it would involve triggered our more lazy side. If we had more time, we would have expanded our catapult to throw more balls farther (with the installation of a bridge). Our biggest issue in the end was the code. Mechanically, everything on the robot functioned correctly - the collector collected, the catapult would have thrown objects (if it could actually go towards a ball), the wheels gripped, the bump sensors detected walls and allowed us to avoid being stuck and nothing exploded. However, starting with Java lost us almost two weeks worth of coding/debugging. Our coders were under a lot of pressure (there were several sleepless nights) and in the end they just didn't account for everything. The overall lack of coding experience also hurt us: only Vamsi really knew how to code and Katherine was forced to blindly try what she had never done before (with surprising amounts of success) while Rebecca and Anthony avoided all coding at all costs for fear of dividing by zero and opening a rift in the universe.
What we learned
We learned how to better ask for help. Initially, we were terrified of appearing incompetent in front of the TAs until we realized that they will not, in fact, bite our heads off. They are there to help any level of understanding as much as they can. They are also very nice. And like cake.
We learned how to quickly build a robot from scratch. Our CAD expert became even more of an expert and we learned how to better fit things together so that they work the first time. Our natural ability to tell if a design/idea will work before even testing it improved.
Everyone learned how to solder and almost everyone learned how to solder things properly to a breadboard and circuit board. We learned how to avoid shorts and save fuses!!
We learned how to divvy up workloads and how to communicate ideas so that everyone is on the same page.
We learned to have fun, no matter how badly things are going!!
Conclusions/suggestions for other teams
A rather unfortunate mistake was that we attempted to rewrite the software interface in java. We are all aero-astro majors, and java is the language most of us are most comfortable with. Unfortunately, we were forced to abandon the idea and use python, as java did not play nice with opencv (the video library) on ubuntu. We lost two weeks to that fiasco.
The journal really does help. Writing everything down everyday puts into perspective how much you can accomplish in a short amount of time. Also, don't be afraid to have fun with it. We ended up doing daily quotes to keep ourselves entertained, even though we didn't keep them all on there (now that potential employers know how to use Google, we can't be too careful).
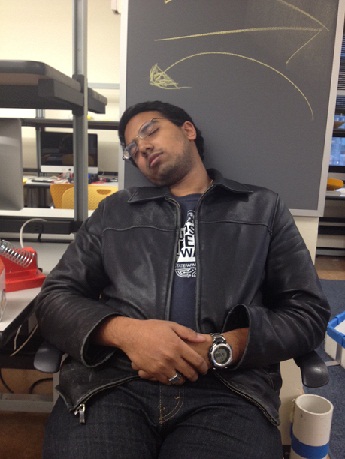
Also, be sure to get some sleep outside of the lab!! :P
