Team Seven/Final Paper

Contents |
Strategy
We ended up deciding to try to make one stack of each color inside the robot, and then find the purple line at the end of match and position the robot so that the right stack was in the right region. Given the number of blocks and amount of time we would have, this was in theory a pretty good scoring strategy. To stack the blocks, we used a roller to push blocks up a ramp into a conveyor belt system which would use friction on two sides of the block to pull it up. At the top of the pulley system was a piece of metal that knocked blocks onto a flipper, which would turn left or right with a servo to drop the block into the appropriate tower.

Mechanical
Our robot consisted of 3 modular systems: collection, elevation & sort.
Collecting
We found that an easy and simple way to collect cubes was to run towers over and use bent metal plates to passively guide the cubes into the desired orientation. Once properly oriented, the cubes would pass under a roller with plastic tubing threads that would push them up a bent metal ramp into the elevation system.
Elevating
To elevate the cubes we employed a conveyor belt system. The system would elevate cubes by applying force on two opposite sides of the cube. The conveyor belts consisted on a total of 10 rollers: 4 slotted rollers to keep the belt from rolling off located at the top and the bottom, and 6 flat rollers whose function was to maintain the tension through belt on the points of contact with the cube. To maintain force on both sides of the cube, opposite rollers would be pulled together by rubber bands.
Sorting
To sort our robot employed a simple flipper that would guide falling cubes into one of two tall box structures depending on the color of the cube.
Electrical
The electronics were mostly centered around a breadboard for power and the Edison for logic. The 15V battery was wired through a fuse and switch to a 15V rail of the breadboard, and a DC-DC converted connected between the 15V rail and another rail provided all our 5V power.
We shorted the battery once because of bad wiring on the breadboard. Make sure the wires you put into your breadboard are stripped short with no wire exposed, and things with potential of shorting are not placed right next to each other. We made heavy use of male connector pins after the short, and this strategy worked pretty well. Also, we color coded wires (black-ground, red-15V, blue-5V, yellow-PWM, green-GPIO), which made it easy to check if things were wired correctly before powering them. Also, twisting and taping wires in the right ways made things neat.
On the final robot, we put all the electronics on a single piece of MDF that could be easily added or removed from the robot, which was extremely useful for example when one person wanted to work on the mechanical side of the robot while another person wanted to test out sensors using the battery and Edison.
Software
We had a class for each type of sensor/actuator we used (gyro, encoder, IR, motor). These contained all the lines of code required to be able to talk to the components (using libmraa) and functions for loops or commands needed to operate them. On top of this, there was a Sensing class that ran a thread for each sensor and provided functions that returned relevant information from the sensors. On top of this there was a Controller class that translated movement commands such as turning or driving straight into commands to the motors using information from Sensing (we made PID loop using the gyro). We didn't have time to implement much more high-level things like a complicated state machine or localization or using the map information, so we just had a main program that ran a simple wall follower using two front facing IR sensors.
Lessons Learned
- Make deadlines and follow them.
- Don't be afraid to ask the staff for help, they're very helpful. If they don't know (or maybe before asking them) consult google.
- Build early, test and rebuild.
- There is always something to do. Better to do it as soon as possible.
- Try not to buy mechanical stuff. You can make almost anything yourself. If you have to buy something buy soon (but, really don't. Ask the staff how to operate the tools in the shop. You'll save time, money and feel awesome).
- Maintain good communication with your team members. Make sure everybody is clear on what they have to do and on what everybody else is doing. If deadlines aren't being kept, bring it up.
- Make sure the wires you put into your breadboard are stripped short with no wire exposed, and things with potential of shorting are not placed right next to each other.
- Learn how to solder properly earlier rather than later.
- You can get all the sensors/actuators working and software classes written for them before you have a robot. You should always try to do something productive regardless of the state of other systems of your robot.
Also, we want to say a HUGE thank you to all the staff! They were extremely helpful handling any problem and encouraged us in the right directions throughout.
Photos

CAD
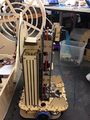
Side View
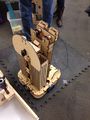
Back View


