Team Two/Final Paper
From Maslab 2011
Overview
Contents |
Team Members
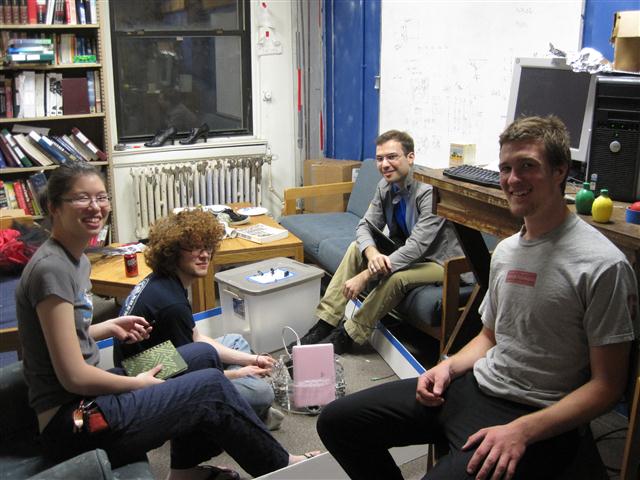
- Leighton Barnes - Course 18, 2013 - Focused on sensor design and electrical work. Instrumental in debugging robot in all disciplines.
- Cathy Wu - Course 6-2, 2012 - Focused on major software components: vision, testing suite, multi-threading, ball collection and scoring behavior. Managed the team and made sure things got done.
- Stanislav Nikolov - Course 6-2, 2011 - Focused on major software components: overall architecture, wall following, control, and stuck detection.
- Dan Fourie - Course 2, 2012 - Focused on mechanical design. Got things done extremely quickly.
Mechanical Design
Our robot was designed for robustness and reliability. The robot serves as a reliable platform for the vision and control software systems. As such, it should be sturdy, constructed quickly, have extremely low mechanical failure rates, be able to withstand hours of testing, and be robust to positioning errors. The robot was designed with CAD to account for all components, to ensure optimum packing, and to facilitate fabrication with the laser cutter. Our team was fortunate enough to have 24 hour access to a laser cutter and waterjet, which made rapid assembly and adjustments possible. The robot's structural members were built primarily from 1/4" acrylic sheet. It utilizes a rubber band roller powered by a DC motor to collect balls and 4-bar linkage hopper actuated by another DC motor to get balls over the wall. DC geared motors will drive no-slip wheels. The robot underwent brutal testing and survived severe battering valiantly.
Drive System
The high level design of the robot's drive system consists of three structural boxes secured together in a line. The boxes are incorporated within a 14" circle to ease navigation. The two outside boxes contain the direct-drive motors, which are mounted to aluminum plates for strength. The central box forms the majority of the rest of the robot's structure and primarily contains the hopper. The three boxes are fastened together with steel brackets (to leverage the powers of the laser cutter and to avoid excessive tapping) and locknuts (to ensure the final assembly did not disassemble).
Toothed no-slip wheels were chosen to minimize slipping on the playing field carpet. This condition proved effective in increasing the speed of the robot and in stalling the drive motors to provide current feedback for stuck detection. The wheels were not perfectly no-slip however, and did not stall in all cases, which was specified in the initial design to obviate the need for bump sensors. The wheels were cut from 1/8" aluminum plate on an abrasive waterjet machine.
Steel hubs were precision machined to provide a stiff, reliable coupling between the motor shafts and the wheels. They also allowed the wheels to be placed as close as possible to the motor in order to decrease torque on the gear boxes.
Electronics Mounting
Electronics were mounted to the robot with the goals of rigidity, interchangeability, and adjustability where necessary.
The EeePC was completely disassembled in order to determine the best way to securely mount it to the robot. It was decided to remove the extraneous monitor and keyboard, but to retain the hard, white motherboard shell to protect the sensitive components. While other teams utilized tape or Velcro, our netbook is bolted to an acrylic plate and shock mounted (with foam padding) to an angled back plate.
In addition, the Orc Board was secured to its own acrylic plate and provided with a protective cover to ward off balls possibly fired from the other side.
The webcam was removed from its plastic housing and the PCB was potted in epoxy and attached to an acrylic backing plate. These adjustments saved an enormous amount of space and allowed the camera to be positioned in the ideal location on the robot. The camera angle was also adjustable which proved valuable in eliminating the need for blue line filtering.
The bump sensor suite covering the front 160deg of the robot was an addition to the initial design. The need for immediate and precise digital feedback about the robot's surroundings was understood after initial testing showed that good obstacle avoidance using IR sensors was difficult to achieve. Each of the five bump sensors are made from a strip of spring steel and a small snap-action switch. The extended levers created by the strips provide a larger area of contact and also protect the switches themselves from damage. In addition to bump detection, the left and right bump sensors aid in aligning with a wall.
A tiny limit switch is triggered at both the up and down limits of the hopper mechanism to signal the motor to stop.
encoders
Scoring Mechanism
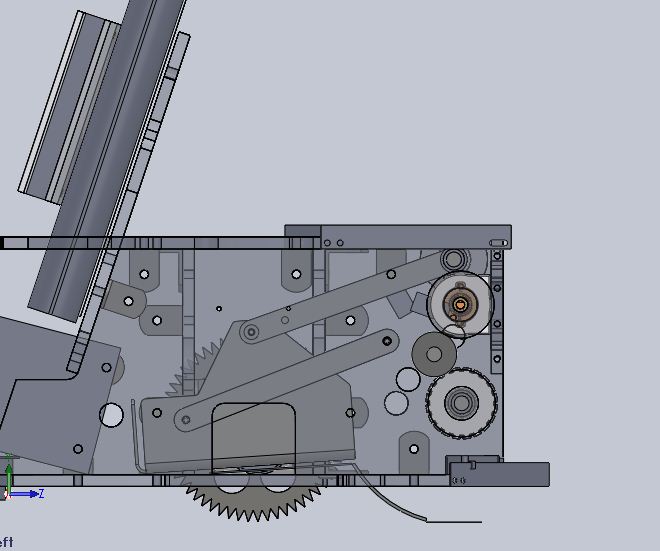
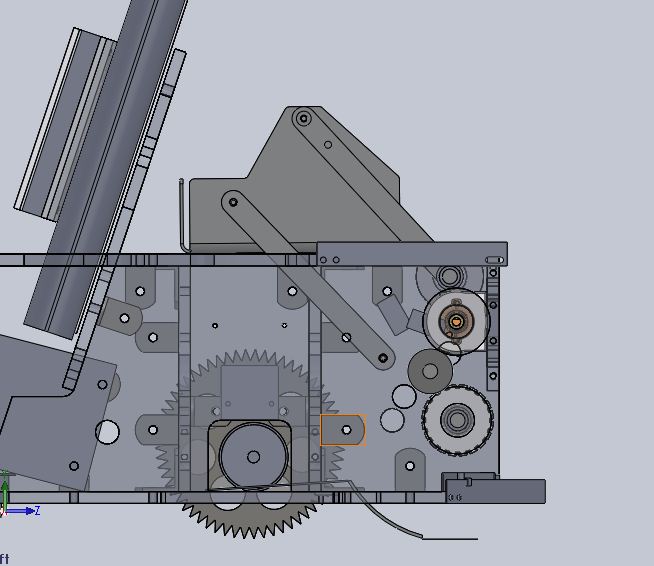
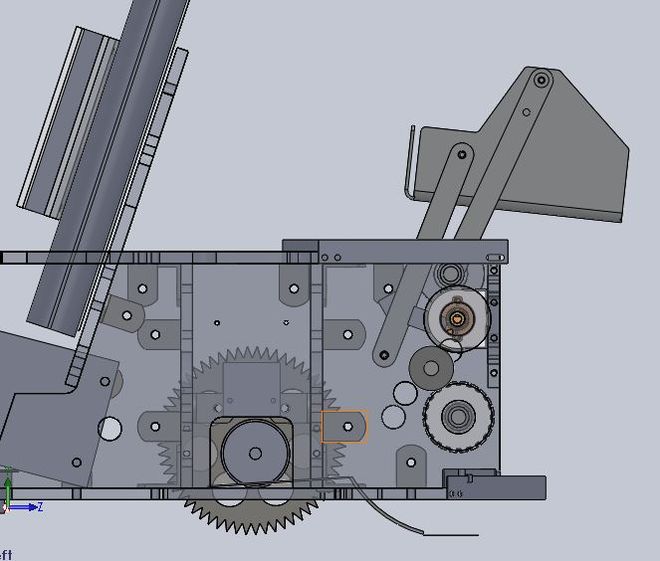
Our scoring mechanism was designed to lift balls from low in the robot to high and well beyond the yellow wall as efficiently and as smoothly as possible. 4-bar synthesis was used to generate a linkage that would move the hopper from a tilted back low position to a tilted forward position over the wall. The leading edge of the hopper extended more than an inch above and three inches beyond the top edge of the wall. This large tolerance in scoring positioning proved invaluable in getting balls over the wall from less than ideal orientations. The all metal parts of the hopper provided durability and compact construction.
Having arrived at this mechanism, and constrained by footprint and form limitations, the rest of the components fell in place around it.
The tried and true rubber band roller was used for picking up balls.
Electrical Design and Sensors
Motor Controllers
Because our robot design required four motors (2 drive motors, 1 to pick up balls, and one to score them) and our Orc Board only features three H-bridges, we had to design an additional circuit to control the last motor. The motor that drives the roller in the front to pick up balls only had to go in one direction, so we chose that one as the one that would be driven by this additional controller.
Our first attempt at this additional controller was just a 40N10 power FET whose gate was driven by the digital out of the Orc Board (with a protection diode accross the motor of course). As we learned with this first attempt, the digital out of the Orc Board is somewhere around 3.7V, instead of the nominal 5V, which could barely overcome the 2-4V gate threshold voltage of the FET (or any other power FET we had on hand). Instead of spending the time to build a gate driver to get around this problem we tried an L298 H-bridge package instead. This worked with the logic-level voltage provided by the Orc Board although we stuck to one directional capability in favor of using the standard four protection diodes instead of one.
Batteries
Throughout the build period Dan and Leighton continued to investigate different battery options and even contructed multiple different kinds of battery packs. The input from previous teams' papers suggested that a high voltage (18V or so) NiCd pack from a cordless power tool was the ideal battery. This type of pack was lighter and had a much higher power density than the standard lead-acid pack. In past years, the increased voltage and power-density such a pack offers would have been a huge plus, but this year we were given adaquately powerful drive motors even when driven at the standard 12V. We found that our NiCd packs ran down much too quickly with their 1.7Ah while the standard lead-acid pack, which was rated at 8.7Ah, could last while testing for hours on end. We also briefly tested a pack of four 3.3V A123 cells which seemed like it could have been the perfect choice. The pack was rated at 2.2Ah, was lightest out of all of them, and dumped as much power as we wanted on demand, but it was a pain to charge. We had access to a charger, but not one that we could take with us anywhere.
Sensor Choice
Bump Sensors
In the end our bot had 5 bump sensors in an arc across its front. We had originally only planned for two in the front to help align while scoring over the wall, but we realized late in the game that bump sensors are an effective tool for dealing with any obstacle. They are free, and there is no reason any bot shouldn't be covered with them.
Break-Beam Sensor
We implemented a break-beam sensor just beneath the roller such that we could detect when we picked up a ball. The sensor was just an IR LED on one side of the bot and a phototransistor in series with a 1Mohm resistor on the other side. We then measured the voltage across the 1Mohm resistor with an analog in on the Orc Board and compared it to some threshold in software. If we had bothered to tune the resistor such that the signal would read approximately 0 or 5V depending on whether the beam was broken or not we could have just as easily used a digital in port.
Encoders
The encoders that MASLAB gives you are unreliable and low resolution. We deliberated for some time on how to replace them. Good, high res optical encoders can easily cost 35$ each which we were unwilling to spend. We ended up using little break-beam packages as geartooth sensors on our wheels. While this theoretically gave us 120 ticks/revolution and the sensor responded quickly and accurately, there were a couple problems. First, there was no quadrature encoding and we were forced to assume that the wheels were going the way that we were commanding them to go. The biggest problem, though, was that while there were many threads running the software didn't sample the signal fast enough to catch every tick. In the end, we didn't really end up using our encoders.
IR Range-Finders
We used 3 long range IR sensors in an arc across the front and one short range IR sensor on each side. The idea was to detect obstacles from far away but still have accurate short range readings for wall-following. The short range sensors were much easier to deal with as there is no noticeable dead zone for short distances and out of range readings can be easily filtered out.
Software Design
Overview
Our software architecture emphasized simplicity and modularity. For the operation of our robot, we used a simple state machine that was mainly driven by a focus on speed and vision. Within each state, we also performed stuck detection and also additional actions if bump sensors were triggered.
We wrote classes that abstracted out each and every type of sensor we used and we forked a thread for each type to record and process readings. During a run, there are about 10 threads running.
On top of abstracting out sensors, we also abstracted out everything else, including images, color statistics, and the on buttons, and had a function for just about everything. This is perhaps excessive, and in the end, we had over 9000 lines of code, but it also came in useful again and again. During our numerous testing sessions, we were able to easily fix most issues because all the functions were already available.
In addition, instead of trying to predict all kinds of situations our robot could be in, we interspersed our code base with the use of randomness and heuristics. For example, if we don't know whether to turn left or right, we will sometimes randomly generate a direction. If we don't know how much we've turned since the last iteration through a loop, we will make a reasonable guess.
State Machine and Robot Behaviors
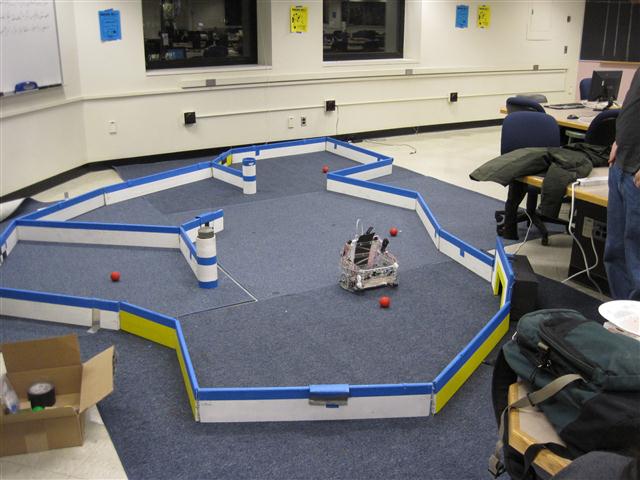
We used a simple state machine design that heavily relied on vision. By default, the robot spins in place scanning the surroundings for balls or scoring walls. Detecting respective objects allows the robot to transition into its ball fetching or scoring behaviors. A timeout into a wall following behavior allows us to roam into new regions to find more objects. All behaviors default to scanning for objects.
Our behavior for obtaining a ball involves lining up to the ball, getting closer to the ball, and then charging it for a short duration. We charge to make up for the complete lack of information when we are too close to a ball for the camera to be useful. This has worked well for us, since it is fairly accurate and also captures balls quickly.
Our behavior for scoring involves lining up to a scoring wall, moving towards the scoring wall until the appropriate bump sensors trigger, extending the hopper to dump the balls, and retracting the hopper. We stop the roller when moving the hopper to prevent balls from getting stuck underneath the hopper. The bump sensors sometimes take several tries to trigger properly, and we often have problems with the robot thinking it is no longer at a scoring wall because the camera is so close that it can only see the blue tape on the wall.
Time and Ball Count
We leveraged some time and ball count information to help robot performance. In the first 30 seconds of a round, our robot does not attempt to score, so that it can collect the easy balls. When the hopper is full of balls, the robot will stop looking for balls and focus instead on scoring. In addition, each ball that the robot obtains allows it to wall follow for more time. The idea is that with fewer balls on the field, the robot should be given more time to explore in order to increase its likelihood of finding new things.
Vision
At a high level, we forked a thread for the camera that continuously takes an image, processes the image, saves statistics about various parts of the image, occasionally publishes the image to BotClient, and repeats. We worked with images in the HSV color space and focused on speed instead of accuracy or detail. That is, we attempted to process as many images as possible and actually did as little processing on each image as we could. The processing steps we took were down sampling 3x, converting from RGB to HSV, and generating statistics on the various colors in the image. Although we implemented many of the fancier image processing techniques (e.g. smoothing, edge detection, connected component labeling), we decided that the higher quality information was not worth slowing down our image processing. Instead, we focused our vision efforts on preprocessing, multi-threading, and various other performance optimizations. In the end, our camera thread was processing images at between 14 and 31 frames per second, depending on how much color there is in an image. (Disclaimer: The staff claims that this rate may not be accurate.)
To prevent from converting each image from RGB to HSV color space using the slow conversion algorithm provided by the MASLAB API, we allocated a 256x256x256 array at the start of each run that maps every RGB combination to its HSV value. Each image is then converted to HSV format using this lookup table and cuts the image conversion time roughly in half. The allocation of the array itself takes less than 4 seconds and is created by reading in a serialized form of the array itself from disk.
Mapping from the HSV color space to a color happens in a separate stage with the use of different HSV thresholds for each color. The two sets of color mappings are separate since the thresholds for each color could be different from day to day. The colors we handled were red, green, yellow, and black. Due to our camera placement and angle, we avoided the need to handle blue.
To determine the thresholds for each individual color, we wrote a user-friendly color calibration utility that we used to adjust to different lighting situations. We place the robot in front of something of the color (e.g. yellow wall) we want to calibrate, start the utility, select the color (e.g. yellow), wait a few seconds, and check BotClient to see if we like the new calibration. The idea is very simple. After studying some images, we found that hue is resilient to lighting changes; it is saturation and value that change. Therefore, we pre-determined the hue values for each color separately based on a sample of images. The utility then takes an image and does two passes through it. First, it collects all pixels within the hue thresholds. In the second pass, it utilizes connected component labeling and generates statistics based on the largest component of the appropriate color to determine reasonable thresholds for saturation and value. Finally, the utility uses the new thresholds to process additional images so that we can move the robot around and evaluate the calibration. The utility did not handle black, but the thresholds for black were fairly straightforward.
To reduce the number of pixels to process per image, we down sampled 3x. With fewer pixels to work with and less resilience to noise, down sampling really pushed our color calibration utility to its limits. 3x is probably the limit for our image processing code. If we did more filtering, more down sampling could be feasible.
Yellow occurs in 2 places on the field: yellow scoring walls and along scoring goals. Both use the same yellow, but the former is favorable to us, but we want to avoid scoring goals. Our solution is very simple. We observed that the goal itself appears black, but that there is usually very little black along scoring walls. Thus, we will only approach yellow that does not also have black. One complication is that when the staff decided to re-introduce bar codes into the field, sometimes the black on the bar codes will make a scoring wall look like a goal to the robot. The upside of our solutions include its simplicity and the ability to prevent our robot from approaching goals from far away thinking that they are scoring walls. The downside is that goal detecting sometimes has false positives as mentioned before. Using a ratio of black to yellow or using connected component labeling could make goal detection more robust, but we decided to sacrifice accuracy for less processing.
data structures
botclient
documentary mode
Control
We used PID position control for aligning with balls and P position control for wall following. We also used open-loop velocity control and abstracted out directly setting PWMs in two ways. The first abstraction was a drive method that takes a particular direction. The second abstraction was a setVelocity method that takes a forward velocity in m/s and a rotational velocity in rad/s. For the second abstraction, we came up with an approximate piece-wise linear model relating wheel velocity and PWM so that we could deal with velocities in a more user-friendly way.
We considered doing closed-loop velocity control using wheel encoders, but we found that open loop control was good enough to carry out our behaviors, and that it was tricky to estimate tick rates from somewhat noisy encoders. We experimented instead with scaling the PWMs supplied to each wheel to get the robot to drive slightly straigher, since it would veer off to one side.
Wall following
Overview
We used a proportional controller to stay at a fixed distance from and roughly parallel to the wall. Each side of robot had an IR sensor perpendicular to the wall and an IR sensor at roughly 45 degrees to the wall. If one of the side sensors is in range of a wall, we start wall following. We set a desired distance for each of the two IR sensors. The robot moves forward at a constant velocity and each IR in-range comes up with a desired rotational velocity by multiplying a gain with the difference between actual and desired distances. The desired rotational velocities are then averaged and the average is commanded to the motors. We did not explicitly calculate the angle to the wall and try to remain parallel but the distance control implicitly took care of that.
IR Sensor Calibration
We found that the raw IR readings did not correspond to the correct distances. We manually calibrated them and came up with linear models for the short-range and long-range IRs, as well as the applicable ranges where the models are valid. The resulting transformed readings were roughly accurate distances in meters, which was good enough for us to work directly with distances rather than try to guess the corresponding raw IR readings.
IR Filtering
IR sensors have limited effective ranges. We found that short-range IRs start giving garbage readings above roughly 0.25 m, and long-range IRs start giving garbage readings below rougly 0.17 m. Garbage readings for the short-range IR were always either too low for the robot to ever experience them or higher than 0.25 m, so we could safely trust any reading between 0.1 m (the minimum short-range reading we could with the way the short-range IRs were mounted) and 0,25 m.
Unlike the short-range IR, whose sets of garbage readings and good readings are effectively disjoint, long-range IRs are a bit more tricky. If a long-range IR is less than about 0.17 m from an obstacle, it will start producing readings as high as 0.60 m. Thus it is difficult to tell whether we are too close to an obstacle or actually at 0.60 m. We considered long-range IR readings above 0.45 m out of range (and in the case of wall following, 0.75 m, since we would lose walls too often). Thus, when we were somewhat far from the wall but still capable of wall following, we would get garbage readings from the short-range IR, but our long-range IR would be in range and we would get closer to the wall. If we got too close, we would start getting garbage readings on the long-range IR sensor and good readings on the short-range sensor, which would push us away from the wall.
Stuck detection
If your robot gets stuck and doesn't do anything about it, you're in trouble. If you have implemented timeouts, eventually your robot will switch states and possibly get unstuck. But what if you are really stuck, and your timeout behavior is inadequate at getting you unstuck? Even if it is adequate, waiting until the timeout to do something wastes precious time when you only have three minutes for a run. We wanted to very quickly detect being stuck (e.g. in a second or less) and to do something drastic to get unstuck, while not being too sensitive and generating false positives. This was a challenge. This section provides an overview of our final method, while the Software Issues section gives some more details on how we got there.
Motor Current
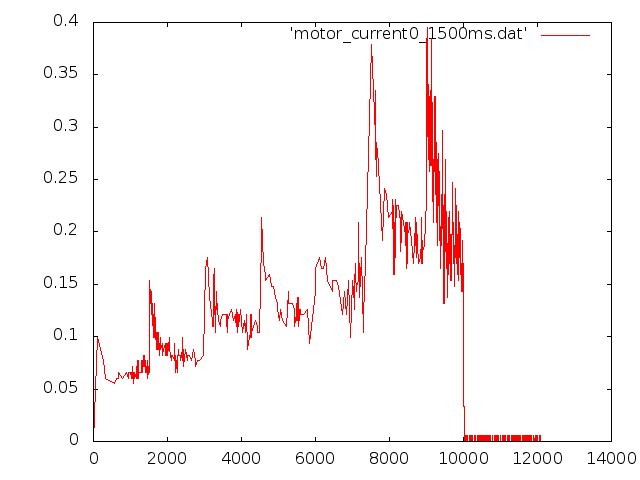
If the wheels are stalled while being commanded to move, then the current through the motors increases. Based on this principle, it is possible to detect if the robot is stuck. We briefly tried using single sensor readings combined with various threshold schemes (constant, and a step function depending on PWM). However, motor current is noisy and has transient peaks (Figure 1) when the PWMs change abruptly, which happens all the time in a typical run. This resulted in many false positives. Ultimately, we filtered motor current in three ways to detect being stuck:
- Long sliding window average
- Short sliding window average
- Consecutive timesteps above threshold
Figure 1: Motor current for a robot driving forward at PWMs of 0.4, 0.5, 0.6, 0.7, 0.8, 0.9, 1.0 for 1500 ms each. Note the transient spikes.
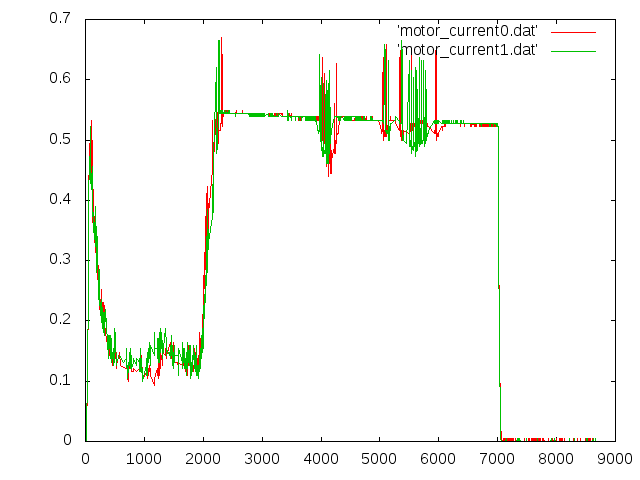
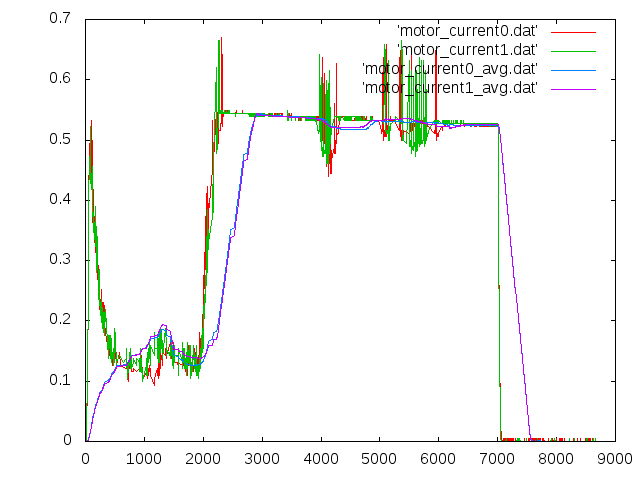
We used the long sliding window to filter out high frequency noise (Figure 3). We then required the current filtered with the long window to be above a threshold for a minimum number of consective timesteps in order to ignore brief peaks and look for sustained peaks, like the one in Figure 2. If those conditions were met, we would check the short window average to see if it was still above threshold. If it is, then we determine that we are stuck. If it isn't, we decide that we've very recently managed to get ourselves unstuck, but the long window still thinks we're stuck due to its longer memory. If we just used the short window, we would be far too sensitive. If we just used the long window, we might have already gotten unstuck by the time we decide that we are. By using the long window statistics as a prerequisite to checking short window statistics, we are more robust to noise on the one hand, and avoid sluggish memory on the other. This way, we are able to decide quickly if we are stuck, and avoid false alarms.
Figure 2: Motor current for a robot that drives forward for a bit and then gets stalled.
Figure 3: Motor current (filtered and unfiltered) for a robot that drives forward for a bit and then gets stalled.
Encoders
Testing
Testing suite
cathy
LED debugging
cathy
Logging
stan (currents, encoders), cathy (vision, documentary)?
We found it useful to log a number of things, especially when debugging stuck detection. We logged motor current and encoder tick values and statistics and plotted them after each run. This was instrumental in understanding how the data looks and using it to detect when we are stuck.
Live Parameter Loading
Our testing was made easier by having a config file from which parameters can be loaded in real time while the robot is running. This made it very quick and easy to tweak gains, thresholds and other parameters. We'd come up with the right gains and thresholds for various behaviors in a single run.
Mechanical Issues
The most serious mechanical issue that arose in testing concerned balls jamming as the hopper rose to score. This jamming was unacceptable because it often prevented reliable scoring for the rest of the run. Fixing the situation could be hacked by limiting the number of balls allowed in the hopper, but restricting the performance of the robot was counterproductive and a more total solution was required. It was found that adjusting the position of the roller motor by adding another gear to the train, as well as shifting the camera mount forward, eliminated jamming, but dropped balls below the hopper, jamming it again on the way down. A flap, coupled to the upward movement of the hopper, was added to restrict the movement of dropped balls to the inside edge of the roller, where they could be picked up again when the hopper descended. This fix increased our ball capacity to eight.
As we were unfortunately not able to provide our EeePC with a static IP address, it was necessary to repeatedly access the PC directly in order to display the dynamic IP address. As our monitor was removed, this had to be accomplished via an external monitor. In its initial position, the PC was mounted too low for easy access to the VGA port. To fix the problem, a new back plate was cut, which raised the PC position while concurrently freeing up space for the heavy SLA battery to move forward.
The steel pins used to transmit torque on all of our shafts repeatedly fell out. This was a necessary evil because they had to remain temporary in order to facilitate changes and part replacements. They were fully press fit in and epoxied for the final competition.
One of our drive motors failed on the day of seeding. This was quickly replaced and the robot continued to function properly. Another motor was immediately acquired and installed to forestall the possibility of the other drive motor failing during competition.
At all times, possible mechanical failure modes were examined and countermeasures were developed to cancel their effects.
Electric Issues
leighton
single-conductor wire and broken connections
uORC sample rate
power for fourth motor
Software Issues
cathy & stan
multi-threading
ball jamming
wireless, changing IP address
Wall Following Issues
Our biggest problems with wall following were cause by leaky abstractions. Leaky abstractions are abstractions that make assumptions about a situation and ignore unecessary details, only to fail when the assumptions are incorrect and the details actually matter.
We had a function that determined whether a direction was free or blocked, and used two sets of thresholds, one for short range and one for long range IRs. We used that to build other functions, such as whether we are following a wall, and on which side. Unilaterally applying the same notions of "free" and "blocked", with the same exact thresholds, for all behaviors was a mistake and led to headaches.
For example, to determine if we were following a wall, we checked to see if either one of each pair of side IRs was "blocked". If we got too far away from the wall such that both IRs on a side are "free" then we would detect that we lost the wall and try to turn in an arc toward it in order to go around what we perceived as a corner. However, the thresholds for determining "blocked" and "free" were set with obstacle avoidance in mind --- not wall following --- and were relatively low. We would often lose the wall not because the wall ended but because we got too far away. This would trigger the corner-rounding behavior, which since we are far from the wall, would make the robot keep driving in a circle until it timed out. It took surprisingy long to find this since we didn't question these low level abstractions.
Performance
Suggestions
- Form a team early and commit to doing MASLAB for all of IAP. We formed our team before the start of the school year.
- Have a well balanced team. It's important to cover all grounds with software, mechanical, and electrical. Our 2 software + 1 mechanical + 1 electrical combination balanced us very well.
- Work really really hard and stay motivated. We pulled endless all-nighters and never gave up. We continued to pester the staff mailing list with questions and even took a day to set up some legit practice fields in 26-100 and test before the seeding tournament.
- Start before IAP and aim to have most of everything done in the first 2 weeks of IAP. Because we did most of the design before IAP, we managed to have a functional robot (not the pegbot) by the first mock competition, which helped us out greatly. We also were able to spend the last week and a half making fixes for various edge cases and had time to just polish up things.
- Don't focus too much on the pegbot and the checkpoints. We had at most 1 or 2 people deal with each of the checkpoints, so the rest of the team could focus on machining the actual robot or designing the software framework. Our pegbot was scrapped in less than a week.
- Test often and relentlessly. You'll find something wrong with your robot every time.
- Redundancy is the name of the game. It is difficult to anticipate all the possible ways your robot can mess up. We had triple (or more) layers of failsafe behavior for some situations. For example, if we hit an obstacle we would rely on bump sensors, motor current peaks, and timing out to detect if we're stuck and escape (we had planned to have a fourth layer using encoder data, but it was tricky to get the right thresholds and didn't pan out in the time we had).
- Beware of the leaky abstraction. Abstractions come about by making assumptions so that you can ignore unnecessary details. Having never been a robot, it is truly difficult to make assumptions about how the robot experiences the world with its sensors. Think carefully about specific situations and come up with tailor-made constants and behaviors. Avoid unilaterally using notions like "near" and "far" or "free" and "blocked" for example --- it really depends on the behavior. See the section on wall following.
- Do not neglect mechanical design. Software can recover; physically broken things cannot. Do not use cardboard, do not use glue, do not use velcro or tape. Try not to use zipties. Be precise. Bash your robot into walls excessively. Fix anything that breaks with double strength.

